This is a little composition created on class, it features mainly some exercises for MIDI automation, using the Komplete 25 keyboard. It features a couple of synth pads throughout the track and also an arpeggio. It has been done relatively quickly and thinking on training purposes so there is a very experimental sound as a whole.
We have also been watching in class some Ableton Live techniques and a walkthrough around different synthesis methods.
On todays’s class we’ve been learning about synthesis and also playing in group some of the synths on the synth room. We have learnt about the basics of synthesis as: oscillators, envelopes, filters, wave shape, pulse width and much more. We started this practical study with the Moog Mother-32 and after we went to the Korg MS-20 mini, both of them great analog semi-modular synthesisers with classic synthesis methods and countless patching capabilities.
After that we started to play some other synths, I started with the Korg Minologue, this is an amazing polyphonic analog synth with a great sound and capabilities. Then I was lucky to be playing the ARP Odyssey, this desktop synth is a vintage classic and it recreates very interesting textures through plenty of modulations. Unfortunately I wasn’t able to record any of these experimentations but the experience was very enjoyable.
Finally, we were exploring the Korg Volcas a bit, I chose the voice Kick, which surprisingly came with the Korg NTS-1 as well, and I was able to try some sync capabilities as well as some compositions.
Develop one of the pieces begun in today’s session to be played in next week’s session.
Add the piece, or a part of it, to your blog. Add some annotation to this.
Reflect on notes taken in today’s session. Consider what aspects of the session may be useful in your personal practice.
As an exercise in relation to sound objects and sampling, we have taken some audio recorders and been recording sounds around the college with whose later on we’ve made a sound composition in Ableton.
This is the result of the audio piece:
It is a very experimental piece of sound design where I’ve manipulated the recorded sounds in order to recreate a mysterious atmosphere. The recordings have been retouched in terms of pitch, envelope and length; and there are also been added several effects like reverb or dynamics.
During the class I enjoyed the explanations about Musique Concrète. I’m really interested in using tape techniques within my sound practice, I already use cassette tape to experiment with and I’ve particularly enjoyed the explanations about reel tape cuts, I hope to explore this field more in depth in the next lessons.
At his point, the composition has been already sequenced and recorded by individual tracks and we just need now to add panning automations, mix the stems properly, add mastering techniques and bounce to an audio file.
The panning modulations were an important step on this projects as I’ve tried to give the sensation to the listener of moving sounds around the spectrum in some sections of the song. In order to do this I have automated the pan control from right to left following the behaviour of the sound at some points to give a realistic feeling of movement. I also added EQ and reverb to the individual tracks and I manipulated them until I achieved the desired sonic shape for each one.
In terms of mastering I just added a Parametric EQ and a Limiter to the master channel in order to gain some volume on the final mix; we can observe which frequencies are louder than they need when we amplify the volume to higher levels, and I have adjusted this with some subtle EQ, in this case I stressed slightly the mid/high frequencies to gain some shine and I lowered the bass around 100Hz.
Overall, I’m very happy with the final result of this composition, I think that I’ve achieved what I was looking for and I did several trials before starting in depth with this project and I think that’s why I’m satisfied with the final outcome. However, I would like to stress as I mentioned at the beginning that this is a university assignment and for me it would differ from another project where we are looking for commercial or musical pleasure, here we’re looking for something where we can demonstrate the use of the different techniques that we are learning in class and that probably made me slightly modify the genres that I normally work with, and add different elements which will make the composition more interesting from an academic point of view.
Now is time for us to complete the collaborative online release and enjoy of this team work together. I have enjoyed creating my track and I hope that it was reflected on this assignment as a whole, looking forward now to the next Creative Sound Projects.
In order to fill a bit more the space in the track and to use a different technique that we’ve seen in class, I decided to include some FX in the mix. To do this I recorded some electromagnetic field sounds with the use of a telephone pickup mic; these contact mics can capture noise sounds from electronic equipment, and then use them as FX or noise. Connecting this microphone to a sound recorder and passing it over a laptop, a games console or a walkman I was able to record some frequencies to play with.
After recording a couple of sequences using this method, I processed this recordings and added effect of delay, reverb and EQ, the result are some additional sounds that will help to recreate that spacey atmosphere that I was looking for on this composition.
After having finished our midi routing and sequencing, the next step in order to store this track was to record every part separately as at the moment each instrument was playing on different channels and the DAW is not able to bounce a combined audio file this way. It is worth to mention that the recording will also include some automation that will be performed live in some values like cut-off or resonance, and specially on the FX unit Microcosm, where there will be a lot of live manipulation in a creative way.
The way I’ve been recording to the computer is through the audio interface “Komplete Audio 6”, a 6 input sound card from Native Instruments that I’ve been using for years in order to manage audio settings through the computer. The input is normally connected to the headphones output of the Digitakt, which is the center of all the gear and where the majority of audio from the hardware goes through, that allows me to make recordings anytime without the need of unpluging anything beforehand. By the time I want to record something, I normally create an audio track beside the instrument track on Ableton, and I route the input channel through it, with the use of the mute and solo settings I will play just the desired track.
Once we’re ready to record, is very important to set the volume gain to an approximate amplitude of -10db, there are different theories about what should be the volume level on the input channel, but one thing is sure, that it should never clip or going to red level, or it shouldn’t be too low, because that will increase the noise level when this part will be amplified; so then the volume input should be moderated, or stay on the beginning of the yellow signal.
When I started the recordings I found that on my mix, the signal was usually too low for recording, so I had to increase volumes wherever I could to get a good signal into the DAW. Another aspect to take into account when recording is to make sure that every other channel is switched off before, as there are normally open channels around whose could be contributing with noise pollution without any use within the recording.
Then I was ready to start recording each instrument separately; for the bass line there was no automations or changes to be done so I recorded a loop with the 16 bar sequence, that would decrease the file size of the project, and also the percussion was recorded in loops. For the synth arpeggio I needed longer takes as it was modulated with different frequencies and effects, specially the granular reverb from Microcosm which is giving those spacey textures to our main synth at the middle of the song, I did this by hand so it took me a couple of takes to achieve the desired effects. Finally the strings were recorded, these were copied/pasted on different places as its structure was the same on some positions.
This was how the whole mix was looking at the end of the recordings:
At this point I had an interesting line of work work the instruments that I mentioned in the last post. This loop sounded quite good for me and I thought that I could stretch these sounds to a whole track so I had to start thinking on a good way to sequence everything altogether with the DAW and being able to record each instrument separately. Here is a little jam with the elements I had at the beginning without any sequencing:
In order to sequence every instrument with the DAW I created a new project on Ableton where I loaded 16 midi tracks, and each one was routed to the Digitakt, because this one features 8 own sample tracks and the following 9 to 16 tracks can sequence any other midi devices so this channel were controlled by Ableton via USB and the Digitakt then was connected via midi to Nerdseq, a modular sequencer which can sequence up to 6 CV tracks on the modular synthesiser, plus a midi device too, where I will connected the Microfreak.
As we can see in the image, this was the main sequencing interface for this project, having routed 16 midi tracks from Ableton to Digitakt, and then from this one controlling other devices in the studio. Nerdeseq then was configured to receive external midi on each of its CV channels, however I only needed one for the baseline but I’ll keep this configuration anyway for future projects.
Everything was ready now to start sequencing the whole track, this is very useful as we can start to see different structure and timing for the different tracks and also create melodies and automations more accurately; this was specially useful when I sequenced the strings on the OP-1, this one just needed to be connected via USB to the computer to be arranged on Ableton, and I was able to create a much more precise sequence for this sound.
These were the most important steps that I followed during the sequencing process, the arrangement of a track is always much more intuitive when is done from a computer with a DAW and it also give us the possibility to make changes on the structure in real time, controlling different instruments from the same device. After some time developing the arrangement and careful consideration to achieve what I was looking for, I just needed now to record every instrument individually and we’ll se this on the next post.
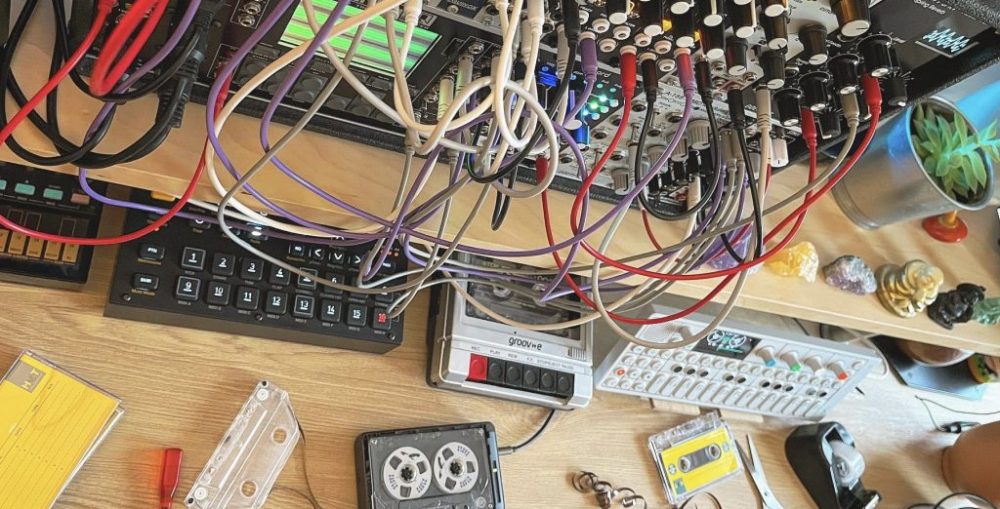
For the creation of this track I will be using a wide range of electronic instruments, devices and software and now I’ll enlist the instruments that I used to create the musical pieces from this track and their role within the composition. These devices have been connected via midi to the computer and audio interface in order to be recorded and sequenced; the software that I used this time has been Ableton Live 11, because it’s intuitive in order to compose and also is quite straightforward in terms of midi configuration.
4ms Ensemble Oscillator – Baseline
This is a polyphonic 16 oscillators synth voice in Eurorack format, and I’ll be music it together with a simple filter to create the bass sound melody that will support the whole composition from beginning to end.
Arturia Microfreak – Arpeggio
This is a versatile paraphonic hybrid synthesiser which features 12 oscillators and 5 bespoke engines; in fact this instruments has been engineered combining the mother boards from the acclaimed Eurorack modules “Mutable Instruments”, its sounds are so clean, eerie and consistent, and I love it to be featured on the front line of my tracks.
Hologram Microcosm – FX
Together with Microfreak I’ll be running this effects processor and it will have a very important role within the composition, it will manipulate the main synthesiser sounds to create some arcane atmospheres. This FX unit in guitar pedal format uses granular techniques to create delay and reverb processing.
Teenage Engineering OP1 – Strings
The OP-1 is a little beast in terms of electronic sound, it features up to 12 different synthesis engines, built-in effects and different sequencers. I will be using it on this composition for melodic string pads.
Elektron Digitakt – Samples
This is an 8-track sampler which I’ll be using for any other sounds and samples that could be introduced on the song especially the percussion, it will be also used as a bridge to sequence other gear, and at the same time is being sequenced from the DAW, I will explain this more in depth in the next posts.
During the conceptualisation of this project I worked on several tracks as sketches trying to find the best sound which would fit with what we’ve been working on as a group on the Creative Sound Projects unit during this second term of the first year. My focus was to make an Ambient or Drone song because those are the genres on which I’m more focused at the moment.
As Brian Eno commented on his Ambient Music manifesto “Ambient music must be as ignorable as interesting” and that was the main objective in the beginning, to create a subtle piece which would focus on the nuances of the tones rather than create a sonically impacting composition. However, as I progressed on its composition, once again, I thought that this university exercise would demand something that would shine a little bit more and would combine different techniques, instead of a mere relaxing ambience, therefore the track featured some minimal percussion and the frequencies were stressed slightly, a bit more than we could expect on an Ambient piece.
After some trials of cause and effect, finally I found the sound I was looking for on a looped composition, this loop featured a dark baseline, a synth arpeggio and some other elements, that’s why I’d catalogue this into Dark Ambient or Synthwave genres, I will show you in the following posts how this was created.
Write a blog post reflecting on the feedback you have received and how you will implement or experiment in response to it:
This week we have shared our work in progress to the rest of the class, the sound piece that I showed featured the first 1min of my current work in progress therefore this work will potentially change a lot, however I received some feedback on the excerpt referring to its genre, possible likely to fit within dark sci-fi cinema and good references about the kit of percussion.
Another idea that I had in mind and I also was referred by the lecturer and piers was the possibility of adding field recordings or magnetic field recordings on top of the composition to recreate this soundscape on a better way. This possibility is being considered strongly to be added but as I mentioned before the track still in a very rough phase of development and there could be many changes on it.
This was the little excerpt that I showed in class and as this was the last lesson in the CSP part one, from now on my blog posts will reflect the further development of my composition whose will form my collection of blog posts relating to this assesment.