We attended to a very interesting lecture by Derek Baron, a musician and sound artist highly experienced and fully focus on his work, always evolving and finding new inspirations in sound composition. He is a member of the University of New York, city where he resides too and where he runs the majority of his artistic practice.
Amongst his multiple works, I’d like to highlight his installations at a planetarium, where he plays long recordings and music compositions, some of them based on cassette recordings from his young ages. Derek is also influenced by conventional visual art and artists from very diverse fields like impressionism, baroque or cartoons and that becomes a source of inspiration within his musical workflow. His main instrument is the piano, he explained about how this instrument was very important for him as a stress relief during the Covid-19 pandemic, this leaded him to write an album during this time.
Create a blog post from your notes gathered during the workshop:
This is a hard field of study where we could yet find many issues, it is also difficult to define but from an educational point of view this is a subject where when can reflect about what was taken to indigenous cultures during the colonisation, and how could we return in some way the culture stolen during that invasions.
In terms of “musical” decolonisation there are many artist whose are trying to claim that cultural legacy through their artistic practice, but in particular we’ve focused the attention to George E Lewis, an afro-american musician and philosopher who has dedicated much of his work to fusion western and African sounds during his career; we have also seen him performing on a video, he follows an opera singer with a digital setup and the composition flows smoothly.
We’ve also seen some plugins made with Max for Live and we tried them on Ableton, these instruments were called Sufi and Apotome, and they try to emulate non western sounds and scales. This was an interesting experience and we also found that there is a community behind programming non-western sounding instruments, something that claims more presence of minorities in electronic music and sound art too.
How would you go about enabling Elastic Audio on a track?EDIT window – Elastic Audio Plug-in Selector
Which real-time Elastic Audio processor typically works best for drums? Which typically works best for vocals?Rhythmic. Monophonic.
Which Elastic Audio plug-in provides only rendered processing? When/why would you want to use rendered processing?X-form. When you want higher quality results, or to reduce processing power, for example in a larger complex session when you’re using lots of plug-ins.
What can Elastic Audio tempo detection determine about an audio file? What are some conditions that will cause no tempo to be detected? It tries to identify rhythmic patterns.Using detected transients Elastic Audio attempts to identify tempo for a file. If tempo detection is successful ProTools will also calculate the file duration in Bars and Beats. Files with only a single transient (such as a one-shot) will have no tempo detected, nor also will files that contain tempo changes or rubato (rushing/slowing tempo), or files lacking a regular periodic rhythm.
Where are Warp Indicators displayed? What are they used for? 5
What views are available for working with Elastic Audio-enabled tracks?What is each view used for?ANALYSIS VIEW: Edit the detected Event Markers on a track. WARP VIEW: create and edit Warp Markers
Name the three types of Elastic Audio markers. What are the differences between them? EVENT MARKERS indicate audio events ( solid black lines in Analysis view and as grey lines in Warp View – they do not fully extend to the top and bottom of the track) WARP MARKERS anchor audio to the timeline (thick black lines with a triangle at the base) and TEMPO-EVENT generated WARP MARKERSindicate where Elastic audio processing has been applied due to tempo events(grey lines with a diamond at the top)
What are some ways to add Warp markers to a clip? List at least three. WARP VIEW: Grabber Tool double-click, Pencil Tool or make a Selection, right-click, ADD WARP MARKER
What is a Telescoping Warp? How does it differ from an Accordion Warp? From a Range Warp? Telescoping Warp lets you stretch/ compress the entire waveform of the clip relative to a start or end point. GRABBER drag any Event Marker to telescope relative to start, opt-GRABBER telescope to end location. Telescoping Warps can be applied to any audio waveform that does not contain Warp markers. Accordion Warp applies Elastic Audio to both sides of a single Warp Marker in a clip. This lets you expand / compress audio equally on both sides of a fixed point. Add a single Warp Marker at the point you want anchored to the timeline, then with the GRABBER drag any Event Marker on either side. Range Warp applies Elastic Audio between two fixed points in a clip. In Warp View create a Warp Marker at the start point, and a second marker at the end point. Create a third marker between the first two and drag to warp the underlying audio while the audio outside the boundary markers remains unaffected.
What is the effect of quantising a selection on an Elastic Audio-enabled track? What happens to the Event markers within the selection?Quantising allows you to align audio events to tick-based information (Bars | beats, sub beats) based on the session tempo. Event markers are used as control points. Those that are closest to the specified quantise grid are promoted to Warp Markings and are moved to the grid.
Why is it important to have accurate Event markers in your clips when applying Quantise operations on Elastic Audio-enabled tracks?Because it is they that become aligned to the grid and hence form the basis of the quantise operation.
After enabling a track for Elastic Audio, how would you enable the track to update dynamically to match any subsequent tempo changes you make in the session?First Enable Elastic Audio, and then change the timebase of all desired audio tracks from samples to ticks.
What are some ways to improve the quality of audio that has been warped with Elastic Audio processing?1. Having accurate event markers (Analysis View), 2. Adjusting Event sensitivity or 3. Using rendered Elastic Audio processing (X-form) – note that X-form processing can take some time!
What is meant by Event Confidence? How can Event Confidence be used to eliminate false transients when applying TCE processing on Elastic Audio-enabled tracks? Each Event Marker is assigned a confidence level based on the relative clarity of the associated transient. CLIP > ELASTIC PROPERTIES window, or right-click the clip and select ELASTIC PROPERTIES or opt- 5 alphanumeric keypad.
What are two ways to apply Elastic Audio pitch transposition? What are some applications for using each option?1. ELASTIC PROPERTIES WINDOW. Apply a pitch shift across selected audio clips. 2. EVENT OPERATIONS > TRANSPOSE WINDOW To create a transposition across multiple tracks including pitched MIDI data.(Pitch transposition is not supported for Monophonic or Varispeed Elastic Audio algorithms)
What timebase do Audio tracks to default to? MIDI tracks? Instrument tracks? By default Audio tracks are sample-based, MIDI and Instrument tracks are tick-based
Which ProTools timescales are absolute? Which are relative? What is the difference between absolute and relative timescales?Sample-based are absolute, tick-based are relative. Absolute timescales remain static and reference fixed measures of time (Samples, Minutes:Seconds, Timecode, Feet+Frames). Tick-based tracks conform to session tempo and reference the relative timescale of Beats| Bars
How do audio clips respond to tempo changes on a sample based track? How do they respond if you change the track to tick- based (without using Elastic Audio)?They will remain static on a sample-based track – if you change an Audio Track timebase to tick-based, the start of the audio clips will become fixed to the Bars |Beats ruler and the start of the Clips will move relative to the sample timeline when tempo or meter changes occur
Pro Tools provides 960 ticks per quarter note; how many ticks does it provide per half note? How many per eighth note? 1920. 480
Why might you want to render a MIDI performance as audio? What are some of the available options for rendering a virtual instrument’s output to an audio file? To make edits or processing in a way that you can’t with MIDI, to save processing power. 1. Drag-and-Drop rendering. 2. Track Freeze
What are some of the different options available for viewing data on MIDI and Instrument tracks in the Edit window? What kinds of operations can you perform in each view? Blocks, Clips view – displays MIDI data for arranging and assembling. Notes View – displays MIDI notes as small individual segments in piano roll style of editing. Velocity View – displays MIDI note attack velocity. MIDIVolume, MIDI Pan and Control Graph views – display automation playlists (Pitch Bend, Aftertouch, Program Change, SysEx) and CC Control line graphs (Mod Wheel, Breath, Foot Control, Expression, Sustain).
Where are the MIDI input and output controls located for MIDI tracks in the Mix window? Where are they located for Instrument tracks?For MIDI: VIEW > I/O view – MIDI INPUT SELECTOR and MIDI OUTPUT SELECTOR. For Instrument: VIEW >Instrument view
What does the MIDI Thru option do? How is it enabled? It allows incoming MIDI data to pass through a track to its MIDI output. OPTIONS > MIDI Thru
What is the Default Thru Instrument setting used for? How can you change the Default Thru Instrument setting?It allows you to preview or audition any MIDI clip in the Clip List. SETUP > PREFERENCES > MIDI tab
What keyboard modifier would you use when clicking on a MIDI clip in the Clip List to audition it? What is required for this process to play sound? opt-click.SETUP > PREFERENCES > MIDI tab – Default Thru Instrument – Follows First Selected MIDI track. Then in EDIT or MIX window select the MIDI track you want to to use as sound source.
How is editing MIDI different from editing audio? How are MIDI notes affected when deleting a selection or trimming a clip compare to how audio waveforms are affected? When cutting, clearing or trimming a selection that includes a MIDI note’s start point the entire note is removed. Conversely, when cutting, clearing or trimming a selection that includes the note’s end point but not its start point the entire note remains and overlaps the end of the clip. When removing and placing MIDI clips with overhanging notes the notes move with the clips. When placing a MIDI clip with overhanging notes next to another clip the overhanging notes extend into the adjacent clip.
What are some of the functions of the Pencil Tool when editing MIDI notes?In many ways the Pencil[f10] is a universal tool for MIDI. It becomes a Grabber Tool when placed over the middle of a MIDI event. It becomes Trim Tool when placed over either end of a MIDI event.opt-click = Selector Tool when not positioned over a note. ctrl+click = Marquee Grabber for selecting individual note and note ranges. cmd+click = Velocity Trimmer when placed over the middle of a note.
What setting determines the Default Note Duration when adding notes with the pencil tool? How can the setting be changed?Current Grid Value. DEFAULT NOTE DURATION in the Edit window Tool bar
How can you select a range of MIDI notes using the on-screen keyboard? Clips view: TAB TO TRANSIENTS allows you to move through subsequent MIDI notes(opt+TAB move to previous) shift+TAB = MIDI note selection. Notes / Velocity Views: Left/ Right arrow (shift+Left/Right extends note selection).
What process can be used to transpose MIDI notes? What modifier can you use to transpose a selection up or down by an octave at a time? Select MIDI notes – Up/Down arrow chromatic or ctrl+Up/Down diatonic (based on Active key on the Key Signature ruler). shift+Up/Down octave. +opt to duplicate selected notes while transposing them, leaving the originals intact.
How can you edit MIDI note velocities from the computer keyboard? Velocity view – Select MIDI note cmd+UP/DOWN (velocity +/- 5) cmd+shift+UP/DOWM (vel +/- 15)
Describe some different ways of deleting notes on a MIDI or Instrument track. What track views allow you to delete notes?EDIT > CLEAR, DELETE , opt+Pencil = Eraser, double click with Grabber or Pencil. Notes / Velocity views.
What menu would you use to display Conductor rulers, such as Meter and Tempo? How can you display rulers without using a main menu?VIEW > RULERS. Clicking the Ruler View selector.
What are the default tempo and meter for all Pro Tools sessions?120 bpm. 4/4
What modifier key would you hold while clicking on a ruler to add a meter or tempo change to your session?ctrl(The ctrl modifier provides an “Add” function in Pro Tools)
What main menu provides access to the Tempo Operations window? What is the purpose of the linear page in the Tempo Operations window?EVENT >Tempo Operations. To create a linear change in tempo events over a range of time. (Other options are Parabolic, S-curve, Scale (%) and Stretch)
How can you configure Pro Tools to use a virtual instrument as the sound source for the metronome click? How can you control what notes are played for the accented and unaccented beats?Turn on the metronome in the MIDI Controls on the Toolbar. To create a Click Track using Click II virtual instrument plug-in TRACK > Create Click Track. Alphanumeric [7] to toggle metronome on/off. SETUP> CLICK Click/Cutoff Options dialogue box (note, velocity and duration)(alphanumeric 7 to toggle metronome)
Describe at least three ways to make a selection for recording.1. Using clips to make timeline selections. Use the Grabber tool (F8) to select a clip (shift-click to extend selection to another clip) Start a record pass, the timeline selection will determine the record range. 2. Making a Selection During Playback DOWN arrow to start selection, UP arrow to end selection. 3. Using timeline selection in and out points to adjust selection. When tracks are record-enabled Timeline Selection In and Out points appear as red markers. 4. Creating a selection from Marker memory locations – click previous marker then shift-click subsequent marker. You can also make a Selection-based Memory Location.
Describe three ways to set the pre-and post-roll values. What modifier do you use to set pre-and post roll by clicking in a track playlist?1. Entered in the Expanded Transport window (VIEW> TRANSPORT > EXPANDED) (/ to move through fields) 2. Set from a track’s playlist or Timebase ruler (opt-click to add pre/post-roll value, disable by opt-click in first (pre) or second (post) half of selection), 3 Recall with a memory location that includes pre-and post-roll values.
What keyboard shortcut can you use to toggle pre-/post-roll on and off? cmd+K
What are alternate playlists on Pro Tools? How can playlists be useful when recording multiple takes? They enable multiple versions of a track, each containing a different arrangement of clips.They allow you to retain each recorded take on a separate instance of the track, which can help with choosing the best take later on. They can also be used for comping.
When might you use the Pro Tools Preferences setting called Send Fully Overlapped Clips to Available Playlist While Recording? How can you ensure that the original audio gets moved to a playlist when re-recording just a section of the original using this setting?PREFERENCES > EditingWhen recording multiple takes. By selecting just that section and separating the clip EDIT > SEPARATE CLIP > AT SELECTION(cmd+E)
What are some differences in the way audio and MIDI clips are created when recording? How do you go about enabling loop recording for audio or MIDI?Audio: ProTools creates a single file that comprises all takes. Takes appear as individual subset clips in the Clip List and are numbered sequentially. If an audio record pass is interrupted before the midpoint of the loop the entire take is disregarded. MIDI: New clips are created each time a new record pass begins. However if no MIDI is received no clip is added. In contrast to audio, if a MIDI record pass is interrupted mid-take, the entire clip is retained regardless of where the pass stopped. 1.Make timeline selection 2. OPTIONS > LOOP RECORD, or right click RECORD button (Shortcut opt-L, or [5] on alphanumeric keypad) (Ensure LINK TIMELINE AND EDIT SELECTION is selected)
What preferences setting do you need to use to enable automatic playlist creation when loop recording?SETUP > PREFERENCES > OPERATION > Operation section: Check Automatically Create New Playlists When Loop Recording
How can you cycle through alternate takes from playlists? How can you audition takes from playlists while cycling through them?Select the current take on the track’s main playlist and use modifiers and arrow keys cmd+shift+UP (next) or cmd+shift+DOWN (previous)
What is the purpose of MIDI merge mode? How can you perform a MDI merge recording while looping? It allows you to add MIDI data to an existing MIDI clip – note that MIDI merge is not compatible with Loop Record mode; Instead record using MIDI Merge and Loop Playback.OPTIONS > deselect LOOP RECORD. Enable OPTIONS > Loop Playback (cmd-shift-L). Record-enable the target MIDI / Instrument track, click MIDI Merge in the MIDI Controls. Select the record range, begin recording and Pro Tools will loop across the selected range.
What are some of the features enabled by Pro Tools | Ultimate software?Full surround mixing capabilities (up to 7.1.2 Dolby Atmos), advanced automation, and video editing features
What is required to import and arrange multiple video clips on the video track? ProTools | Ultimate. ProTools standard only allows a single video clip
Name some areas of focus available for Workspace browsers in Pro Tools.Sound libraries, Volumes, Session, Track presets, Catalogues (user created file collections) and Userlocations
What are some of the functions that you can perform using a Workspace browser? Search files, audition audio files, use elastic audio to hear audio in the context of session tempo, and drag-and-drop files into an open session
How can you audition files from the browser? How can you audition them in context with your session?Using spacebar (if that option has been selected in the workspace browser pop-up menu) or clicking PREVIEW in the browser toolbar or the PLAY icon to the left of a waveform display. Enabling Audio files conform to session tempo button (metronome) in the browser toolbar. (Right click on the metronome icon to select the appropriate Elastic Audio processor). Place the insertion point in the session at the location you want to preview the file.These previous steps enable you to preview audio files at the tempo of the project. To preview in context, do the above, activate playback of your session by pressing zero key on numeric keypad and activate preview using any of the audition methods previously described.
What is Soundbase? What are tags in Soundbase? A workspace browser window that allows you to find audio files using tags. Tags are descriptive labels that are saved as meta-data (file properties) within an audio file.
What are some available destinations when importing audio from a Workspace browser or Soundbase?The Timeline, a Track, the Track list or the Clip List
What are some of the different types of media you can import into Pro Tools (in addition to audio files)?MIDI, video, Clip Groups, Track presets, IO settings, Session Data
What command allows you to import entire tracks from another ProTools session into your current session? FILE >IMPORT > SESSION DATA. Shortcut: option+shift+I (cmd+shift+I import audio, cmd-opt+I import MIDI)
What types of clips can be grouped together as a clip group? Can clips of different types be combined into a single clip group?Audio, MIDI and video. Yes – different types can be combined into a single clip group. Shortcut to create Clip group opt+cmd+G
How many clips are required for a clip group? Can clip groups contain silence?There is no minimum. Yes – clip groups can contain silence.
What kind of icon is used to indicate a clip group? Where is the icon located? There are different kinds of icons for different types of clip groups (Audio, MIDI, Video, Non-contiguous, and Mixed Multitrack). These icons are displayed at the bottom left of the clip.
What do the UnGroup and UnGroup All commands do?How would you go about re-assembling a clip group after using one of these commands?Ungroup ungroups clip groups and when used on nested clip groups it operates in layers. Ungroup All ungroups all nested Clip Groups simultaneously. CLIP > UNGROUP or Shortcut to Ungroup opt+cmd+U. A clip group can be reassembled using the REGROUP command. CLIP > REGROUP or shortcut opt+cmd+R.
How can you sign in to your Avid master account when starting work in Pro Tools? What is required to sign in to your account?From the Dashboard. You’ll need an Internet connection, an AVID account, username and password
Why is it important to select the audio interface you want to use prior to creating or opening the session? What dialog box can you use for this purpose?If you subsequently change this it will require ProTools to close and reopen. Setup -> Playback Engine dialog box.
What is the H/W buffer size setting in the playback engine dialogue box used for? What kinds of tracks are affected by this setting?It determines the number of samples pass from the audio interface to the CPU at one time. The lower the buffer size, the faster samples are passed to the CPU – low buffer sizes minimise latency, at the cost of limiting the processing power, which takes resources from other CPU tasks (e.g. plug-in processing) It only affects tracks using the low latency processing domain– native (PT) plugin processing on record-enabled Audio tracks (also when audio tracks are TrackInput Monitor Mode enabled), Auxiliary and Instrument tracks
What dialog box can you use to access the available options for your connected audio interface?Setup -> Hardware setup
How can you specify which I/O settings on Pro Tools will use when creating a new session from the dashboard?By using the Dashboard I/O settings drop down menu
Where are changes to Pro Tools I/O settings saved? Are they stored in the session or on the system? User/documents/Pro Tools/I/O settings. i.e. on the system
What dialog box can you use to rename signal paths? Setup > I/O Setup dialogue box
How can you configure an Audition Path in Pro Tools?I/O Setup dialogue box >Audition Path drop-down menu
What are some ways to open recently used project or session on a system?Dashboard > Recent projects. File > Open Recent
What shortcut operation can you use to add an individual audio track to your session? cmd+double click. (Instrument: opt+double click, Aux : ctrl+double click, Master: shift+double click)
What options are available for changing the display of the Mix and Edit windows? What are some of the optional views available in each window?View -> Narrow mix, Rulers, Track Number, Expanded Sends. Mix: Preamps, Inserts A-E, F-J, Sends A-E, F-J, EQ, I/O, Meters and Faders, Delay Compensation, Comments, Track Colour.Edit (as Mix): plus Real-Time properties(no Delay Compensation)
How can you easily show or hide tracks? What is the difference between hiding a track and deleting a track?Track List. Hiding a track makes it not viewable in Edit/ Mix window – it still exists in the session project. Delete removes track from the session
What are some options available in the Track List pop-up menu?Show, Hide, Sort
At his point, the composition has been already sequenced and recorded by individual tracks and we just need now to add panning automations, mix the stems properly, add mastering techniques and bounce to an audio file.
The panning modulations were an important step on this projects as I’ve tried to give the sensation to the listener of moving sounds around the spectrum in some sections of the song. In order to do this I have automated the pan control from right to left following the behaviour of the sound at some points to give a realistic feeling of movement. I also added EQ and reverb to the individual tracks and I manipulated them until I achieved the desired sonic shape for each one.
In terms of mastering I just added a Parametric EQ and a Limiter to the master channel in order to gain some volume on the final mix; we can observe which frequencies are louder than they need when we amplify the volume to higher levels, and I have adjusted this with some subtle EQ, in this case I stressed slightly the mid/high frequencies to gain some shine and I lowered the bass around 100Hz.
Overall, I’m very happy with the final result of this composition, I think that I’ve achieved what I was looking for and I did several trials before starting in depth with this project and I think that’s why I’m satisfied with the final outcome. However, I would like to stress as I mentioned at the beginning that this is a university assignment and for me it would differ from another project where we are looking for commercial or musical pleasure, here we’re looking for something where we can demonstrate the use of the different techniques that we are learning in class and that probably made me slightly modify the genres that I normally work with, and add different elements which will make the composition more interesting from an academic point of view.
Now is time for us to complete the collaborative online release and enjoy of this team work together. I have enjoyed creating my track and I hope that it was reflected on this assignment as a whole, looking forward now to the next Creative Sound Projects.
In order to fill a bit more the space in the track and to use a different technique that we’ve seen in class, I decided to include some FX in the mix. To do this I recorded some electromagnetic field sounds with the use of a telephone pickup mic; these contact mics can capture noise sounds from electronic equipment, and then use them as FX or noise. Connecting this microphone to a sound recorder and passing it over a laptop, a games console or a walkman I was able to record some frequencies to play with.
After recording a couple of sequences using this method, I processed this recordings and added effect of delay, reverb and EQ, the result are some additional sounds that will help to recreate that spacey atmosphere that I was looking for on this composition.
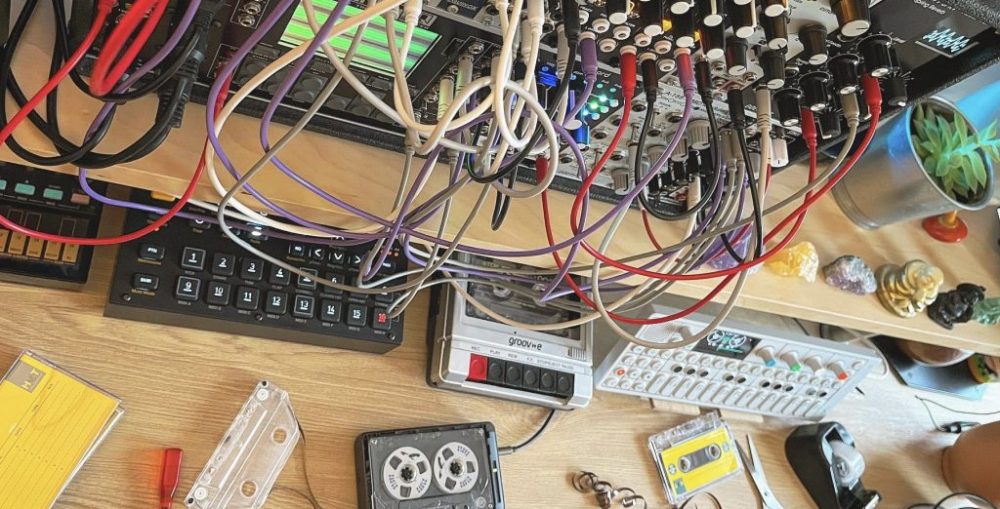
After having finished our midi routing and sequencing, the next step in order to store this track was to record every part separately as at the moment each instrument was playing on different channels and the DAW is not able to bounce a combined audio file this way. It is worth to mention that the recording will also include some automation that will be performed live in some values like cut-off or resonance, and specially on the FX unit Microcosm, where there will be a lot of live manipulation in a creative way.
The way I’ve been recording to the computer is through the audio interface “Komplete Audio 6”, a 6 input sound card from Native Instruments that I’ve been using for years in order to manage audio settings through the computer. The input is normally connected to the headphones output of the Digitakt, which is the center of all the gear and where the majority of audio from the hardware goes through, that allows me to make recordings anytime without the need of unpluging anything beforehand. By the time I want to record something, I normally create an audio track beside the instrument track on Ableton, and I route the input channel through it, with the use of the mute and solo settings I will play just the desired track.
Once we’re ready to record, is very important to set the volume gain to an approximate amplitude of -10db, there are different theories about what should be the volume level on the input channel, but one thing is sure, that it should never clip or going to red level, or it shouldn’t be too low, because that will increase the noise level when this part will be amplified; so then the volume input should be moderated, or stay on the beginning of the yellow signal.
When I started the recordings I found that on my mix, the signal was usually too low for recording, so I had to increase volumes wherever I could to get a good signal into the DAW. Another aspect to take into account when recording is to make sure that every other channel is switched off before, as there are normally open channels around whose could be contributing with noise pollution without any use within the recording.
Then I was ready to start recording each instrument separately; for the bass line there was no automations or changes to be done so I recorded a loop with the 16 bar sequence, that would decrease the file size of the project, and also the percussion was recorded in loops. For the synth arpeggio I needed longer takes as it was modulated with different frequencies and effects, specially the granular reverb from Microcosm which is giving those spacey textures to our main synth at the middle of the song, I did this by hand so it took me a couple of takes to achieve the desired effects. Finally the strings were recorded, these were copied/pasted on different places as its structure was the same on some positions.
This was how the whole mix was looking at the end of the recordings: